
Screenshot is a best way to capture part of or the entirety of your phone, window, and computer, laptop display, from an image you want to annotate and share to an online receipt you’d like to snip and save. In window 10, there is built-in tools-Snip & Sketch and Snipping tools well as a number of keyboard shortcuts for capturing screenshots. However, why window only, you can take a screenshot on every device such as iPhone, Android phone, Computer, laptop, Mac, or iPad, or more.
In this article, we will guide you on how you can take a screenshot on your device. Doesn’t matter which device you’re using. We will try to cover the most related topic with this to ease your problem and end your search here. Read on.
5 Ways You Can Take Screenshots in Window 10
Here, we will explain the 5 different ways to take screenshots in Window 10. The window allows you to use these 5 easy ways to take screenshots. Let’s learn how to apply these 5 methods.
1. Take Screenshot using Snip & Sketch
Snip & Sketch is Windows built-in tool and is completely easy to access, share and annotate screenshots than the old snipping tool. And it can now capture a screenshot of a window on your desktop, a surprising omission when the app was first introduced that kept me on the Team snipping tool until recently.
To access it, press the Window key + Shift S simultaneously on the window. You can also find the Snip & Sketch tool listed in the alphabetical list of apps accessed from the Start button as well as in the notification panel where it listed as Screen snip.

Alternatively, go to the Window search box, and type the Snip & Sketch tool. You will see the tool easily.
Either using the keyboard shortcut or the notification button will dim your screen and open a tiny menu at the top of your screen that lets you choose which type of screenshot you want to take. Once you take a screenshot. It will be saved to your clipboard and show up momentarily as a notification in the lower-right
corner of your screen. Tap the notification to open the screenshot in the Snip & Sketch app to annotate, save, or share it. (If you miss the notification, open the notification panel and you’ll see it sitting there.)
Note: If you opened the tool from the Start menu or by searching for it, it will open the Snip & Sketch window instead of the small panel at the top of the screen. From here, you will tap on the New button in the upper-left corner to initiate a screen capture and open the small panel.
2. Take a Screenshot using Print Screen
The snipping tool is very popular in Windows and has been around since Windows Vista. The window has warned for a couple of years that the Snipping Tool is moving away, but it’s still kicking around. The Snipping Tool has been delisted from the list of apps from the Start menu, but it’s really accessible via the search bar.

Now tap on the New button to take a screenshot. The default snip type is a rectangular snip, but you can also take free-form, full screen, and window snips. Make sure that the Snipping tool will not automatically save your screenshot-you will need to manually save them in the tool before your exit- and it also doesn’t automatically copy your captures to the clipboard.
3. Take a Screenshot using Print Screen
Print screen is the best way to take your full-screen screenshot. Print screen is easy to do and it’s completely a shortcut to take a screenshot easily on the window- and the Print screen automatically copies your screenshot so you copy it everywhere. But make sure Print Screen will not automatically save your screenshot on the desktop. However, to do use, you’ll need to follow a couple of steps below.

You can also set the PrtScn button to open the Snip & Sketch tool by going to Settings > Ease of Access > Keyboard and toggling on Use the PrtScn button to open screen snipping under Print Screen Shortcut.
5. Take Screenshot using Windows key + Print Screen
Another way to take screenshots on your computer window 10, is by pressing the Window key + Print Screen on your computer. It will capture your entire screen and automatically save the screenshot, tap the Window key + Print Screen key. Your screen will briefly go dim to indicate that you’ve just taken a screenshot, and the screenshot will be saved to the Pictures >Screenshot folder.
6. Take Screenshot using Use Alt + Print Screen
Our 5th way of taking screenshots is to press Alt + Print Screen on Window and takes a quick screenshot of the active window. To use this keyboard shortcut, press Alt + PrtScn on the keyboard. Once you press it, this will snap your currently active window and copy the screenshot to the clipboard. You’ll need to open the shot in an image editor to save it.
How to Take a Screenshot on Mac
We will guide you in various ways to take a screenshot on Mac. You can save your snap on Mac, and even can share it with anyone. Let’s find the ways to take a screenshot and how to do so.
Take a Screenshot using macOS Keyboard Command
This is the easiest and quickest way to take screenshots on your Mac, whether you’re capturing the entire screen or just a portion of the screen. By default, Apple’s methods save your screenshot to the desktop, but it won’t copy your screenshot.

- Press the Command + Shift + 3 keys simultaneously for instant capture of your desktop. Now press the Command + Shift + 3 +Control keys to save the image to your clipboard.
- When you only want part of the screen captures, press Command + Shift + 4 on the keyboard and it will turn the cursor into a crosshair. Now, select the section of the screen you want to capture.
- If you want to capture a specific window, use Command + Shift + 5 and then hit the space bar to switch between capturing a section of the screen and a specific window. If you have a Mac with a Touch Bar, capture that by pressing Command + Shift + 6.
Take a Screenshot using Screenshot App
Some Mac computer such as macOS Mojave and newer includes a Screenshot app. You can use these apps to take a screenshot on Mac. It gives three capture tools, plus options for saving, whether to show the pointer, and more. You can access this app by opening the Other folder on the Launchpad, but it’s easier to use keyboard commands.

Note: If you have a MacBook Pro with Touch Bar, these options appear on the OLED strip. Another Touch bar exclusive is taking a screenshot of the Touch bar display, and that can be done by tapping Shift + Command + 6.
- Press the Command + Shift + 5 Simultaneously to load the Screenshots toolbar, and choose your Target shot- Entire screen, selected window, or selected Portion. By default, the resulting image saves to the Desktop.
- Now, you can use the Screenshot app to change the default save location of your screenshot. Tap the Options on the toolbar and select Desktop, Document, Mail, Message, QuickTime Player, or Other location.
- Choose the last option to send your snap to a specific location, like a dedicated snap folder you can create by tapping New Folder.
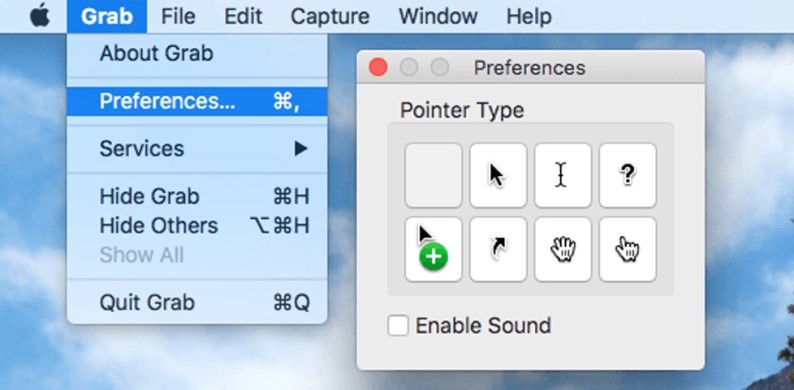
Take a Screenshot with Grab
Using Grab, you can take a screenshot of a particular section of the screen, an individual window, or the entire screen. The same three options previously outlined above. It also has a Timed Screen option, which gives you a 10-second delay before capturing the screenshot. This means that if you need to open a menu or place the pointer in the right position, you have time to do so.

- To open the Grab, open Finder and select Application listed on the left. Double-tap on the utility folder and choose Grab.
- Once you launched the Grab, elect Timed Screen from the Grab menu, or press its shortcut: Command + Shift + Z.
- It won’t indicate to you that a screenshot is taken, to confirm that it’s done, click Preferences from the main Grab menu and select the printer icon from the resulting pop-up window.
Note: If you’re using macOS Catalina or newer, Grab is not included. Instead, its features now reside in the Command + Shift + 5 key combinations.
Take a Screenshot with Preview
Preview is the built-in tool in Mac and it allows you to open everything from photos to PDF files. It has more than a few lesser-known features, such as editing images by tapping the toolbox icon. Preview captures a screenshot, too!

- Open the Finder and choose the Applications listed on the left. Double-tap on Preview to open the app.
- Now once you open the app, tap the File located on the menu bar. From the drop-down menu, fly your mouse over taking screenshots, and select From Selection, From Window, or From Full Screen, depending on your preference.
Note: Why Preview is better than others?
- When you use Preview: You can choose where to save screenshots
- Preview opens the screenshot, lets you make a few edits, and then you can save the file wherever you like. If that matters to you, Preview is a solid choice.
How to Take a Screenshot on your iPhone, iPad, and iPod Touch
Learn how you can capture the screen on your iOS device:
On an iPhone X or Later
- Press and hold the Side button on the right side of your iPhone. Instantly, tap the Volume up button on the left side, then release the buttons.
- A thumbnail of your screenshot appears in the lower-left corner of your iPhone. Tap the thumbnail to add drawings and text with Markup, or press and hold the thumbnail to share the screenshot. Swipe left on the thumbnail to dismiss it.
On iPhone 8 or earlier, iPad, and iPod Touch
There is little change in the above and iPhone 8 or earlier iOS device to take a screenshot.

- Press and hold the top or side button on your iPhone, iPad, or iPod touch. Immediately press the home button, then release the top or side button.
- A thumbnail of your screenshot appears in the lower-left corner of your iPhone. Tap the thumbnail to add drawings and text with Markup, or press and hold the thumbnail to share the screenshot. Swipe left on the thumbnail to dismiss it.
- If you want to find the screenshot you just took, along with ones you’ve taken before, go to Photos >Albums and tap Screenshot.
Take Screenshot with Home + Sleep

Another way of taking screenshots on iOS devices is quite easy and quick. To capture a screenshot of your iPhone or iPad is to press and hold the “Home” button and simultaneously press the “Sleep/Wake” button. A screenshot will be saved to your camera roll.
Take Screenshot using the AssistiveTouch Floating Button
To use this method, make sure that you’ve already turned on the AssistiveTouch Floating button on your iOS device. Once you’ve done this, touch the floating button and it will open a series of dark screens that require only one touch to move from one to the next and ultimately result in the capture of a screenshot.

Tap on the “More” option opens this third dark screen and you can now touch the icon “Screenshot” to capture the screenshot or screen.
Take Screenshot using Screenshot App
When it comes to using a Screenshot app to capture the screen, WebCapture is a free utility application available for your iPhone, and the best part that you can use used it on your iPad. This app is quite simple and specially made to take screenshots of the website. When you open it, it acts as a browser so make sure to add “http://” before all URLs. In this app, usually, you cannot do cropping or editing required. The photo is saved on your camera roll.
Note: This app only takes a screenshot of the view on your screen, not an image of the entire webpage.
How to Take Screenshot on Apple Watch
You may surprise to know that you can take a screenshot of your Apple Watch Screen. But to do so, the feature must be enabled. Open the Watch app on your iPhone and go to My Watch >General>Enable Screenshot and toggle it on.

Once you’ve enabled the feature, you can take a screenshot now. To do so, pull up the screen you want to capture. Hold the Side button and tap the Digital Crown simultaneously. Like on iPhone, the screen will “flash” white and the camera shutter will go off. You can see the screenshot will then appear on your iPhone’s camera roll, not the watch itself.

How to Take Screenshots on Android
In the past years, Android 4 introduced simple & similar screenshot for all the Android device with the handy power-and-volume-down-key combo, nailing it can still be tricky. Because of this, some phone company have introduced new methods to take screenshot on Android. Don’t worry, we will help to learn how to take screenshot on Android, you just need to find your Android phone on the list below and learn the different ways to snap, save, and share your snap with anyone easily on Android.
Take Screenshot on Google Phones
- Nexus: Hold down the power and volume-down button for a couple of seconds. Screenshot will be saved in your gallery by default.
- Pixels: Hold down the power and volume-down button for a couple of seconds. Screenshot will be saved in your gallery by default.
Take Screenshot on OnePlus Phones
- All OnePlus Phones: Press and hold down the power and volume-down buttons for a couple of seconds. Once the screenshot taken, release the button.
- OnePlus 5, 5T, and 6: Swipe down with three fingers on the home screen.
Note: Snap will automatically save in the default gallery.
Take Screenshot on Samsung phones
- Galaxy S8 and Later: Hold down the power and volume-down button for a couple of seconds. Screenshot will be saved in your gallery by default.
- Galaxy S7 and earlier:Hold down the power and volume-down button for a couple of seconds. Screenshot will be saved in your gallery by default.
Take Screenshot on Sony Phones
- Hold down the power and volume-down button for a couple of seconds. Screenshot will be saved in your gallery by default.
- Hold down the power key until a screen appears and tap Take Screenshot
Take Screenshot on Lenovo
- Hold down the power and volume-down button for a couple of seconds.
- Pull down the notification panel and tap the Screenshot icon.
Take Screenshot on LG Phones
- LG G7:Hold down the power and volume-down simultaneously button for a couple of seconds.
- All other LG phones: Press and hold down the power (located on the back of the phone) and volume-down buttons for a couple of seconds Pull down the notification panel and hit the Capture + icon
Take Screenshot on Asus Phones
- Hold down the power and volume-down simultaneously button for a couple of seconds.
- Pull down the notification panel to reach Settings and hit the Snap + icon
Take Screenshot on Huawei and Honor phones
- Hold down the power and volume-down simultaneously button for a couple of seconds.
- Drag the notification bar, switch to Shortcuts, and hit the Screenshot icon.
Take Screenshot on Motorola phones
- Hold down the power and volume-down simultaneously button for a couple of seconds.
Take Screenshot on Sony Phones
- Hold down the power and volume-down button for a couple of seconds.
- Press and hold down the power button until a screen appears and tap take Screenshot.
Take Screenshot on HTC Phones
- HTC U12+: To take screenshot, press and hold down the power button until your phone vibrates, and then tap the virtual home button on the navigation bar while still pressing the power button.
- HTC series (up to U12+): Hold down the power and volume-down buttons for a couple of seconds.
- HTC 10: Hold down the home and power button OR you can hold down the power and volume-down button for a while.
- Other HTC phone: Hold down power and volume-down button for a while.
Take Screenshot on Acer phones
- Hold down the power and volume-down buttons for a couple of seconds.
- Pull down the notification panel to reach quick settings and tap the Screenshot icon.
Take Screenshot on ZTE phones
- Press and hold down the power and volume-down buttons for a while.
How to Take Screenshot with Google Assistant
You can ask Google Assistant to take a screenshot for you. To do so, when you’re on the screen you want to snap, just say, “OK Google, take a screenshot,” and it will oblige, saving a picture of the screen below the Assistant interface.
Now, once you’ve snapped your screenshot you can create a shortcut to it in the notification panel. Tap it and you will be able to edit or share it.
Summary
This was the guide about how to take a screenshot. Here, we discussed various and different methods to take a screenshot of different devices. However, this cannot be the ending of options; there are still various devices and ways to take screenshots. However, mentioning all the options really cannot possible. But if your device is missing from the above list, make sure you leave a comment about your issue with the device you are using and we will assist you as soon as earlier.
0


